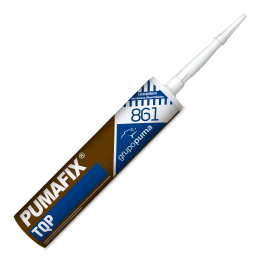
 Pumafix® TQP

Injection resin for anchorage, 2-component and fast curing, resin-based polyester. Styrene-free. Multifunctional, for solid or hollow substrates.
Additional information
Technical Caracteristics
Styrene-free, unsaturated polyester resin.
Advantages and Uses
- Chemical bonding of horizontal and vertical anchors.
- Suitable for solid and hollow substrates.
- Styrene-free; low odour.
- Easy extrusion and injection.
- Thixotropic, can be applied either horizontally or vertically.
- Fast curing.
- Can be applied with conventional guns.
- For use on concrete, bricks and concrete masonry units in a wide range of applications: bonding doors, railings, balustrades, Persian blinds, awnings, aerials, signs, cable tray channelling, industrial machinery…
Suitable Substrates
- Substrates must be resistant, stable, sound and clean, free of dust, demolding agents, organic products, etc. It is not necessary for them to be 28 days old.
- If the condition of the substrate is unknown, it is recommended to carry out extraction tests to test the suitability of the substrate.
- Once the perforation of the substrate has been made, clean any residue using compressed air or a cylindrical brush.
- Threaded or round steel rods must be free from any oil or grease.
Application Procedure
INSTALLATION INSTRUCTIONS FOR SOLID BRICKWORK
- Drill a hole in accordance with the diameter and depth shown on the application table. During the drilling process, the perpendicularity of the hole in the substrate should be checked.
- Clean the hole of dust, fragments, oil, water, grease and other contaminants before injecting the mortar (with the manual blower and standard manual brush).
- The cleaning of the hole consists of 4 blowing operations, 4 brushing operations followed by a further 4 blowing operations.
- Before brushing, the brush must be cleaned and the diameter checked to ensure it is the correct size.
- The threaded rod must be free from any dust, grease, oil and other impurities.
- Unscrew the top of the cartridge, engage the mixing nozzle to the cartridge and position in the gun.
- At the start of using a new cartridge, eject some product until a uniform colour of the mortar appears.
- Fill the drilled hole uniformly from the bottom up to avoid air pockets, moving the nozzle slowly outwards.
- Fill 2/3 of the depth of the drilled hole with mortar.
- Insert the threaded rod slowly and with a slight rotating movement, remove the excess mortar injected from around the threaded rod.
- Wait the necessary curing time in accordance with the datasheet.
- Do not move or load the anchor until the curing process has finished.
INSTALLATION INSTRUCTIONS FOR HOLLOW/PERFORATED BRICKWORK
- Drill a hole in accordance with the diameter and depth shown on the application table. During the drilling process, the perpendicularity of the hole in the substrate should be checked.
- Clean the hole of dust, fragments, oil, water, grease and other contaminants before injecting the mortar (with the manual blower and standard manual brush).
- The cleaning of the hole consists of 4 blowing operations, 2 brushing operations followed by a further 4 blowing operations.
- Before brushing, the brush must be cleaned and the diameter checked to ensure it is the correct size.
- The threaded rod must be free from any dust, grease, oil and other impurities.
- Select the correct size of sieve.
- Unscrew the top of the cartridge, engage the mixing nozzle to the cartridge and position in the gun.
- At the start of using a new cartridge, eject some product until a uniform colour of the mortar appears.
- Remove the top of the plastic sieve.
- Introduce the plastic sieve in the hole.
- Fill the sieve uniformly from the bottom up, moving the mixing nozzle slowly towards the outside: move the mixing nozzle 10 mm towards the outside each time you pull the trigger.
- Completely fill the sieve.
- Place the top on the filled plastic sieve.
- Insert the threaded rod slowly and with a slight rotating movement, remove the excess mortar injected from around the threaded rod.
- Wait the necessary curing time in accordance with the datasheet.
- Do not move or load the anchor until the curing process has finished.
Number of Anchors per drilled hole diameter
| Anchor | INSTALLATION IN HOLLOW SUBSTRATES | |
| Rod | Sieve 16/85 | Sieve 16/130 |
| 280 ml | 280 ml | |
| M8 | 11 | 7 |
| M10 | 11 | 7 |
| M12 | 11 | 7 |
| M16 | - | - |
| M20 | - | - |
|
Anchor |
INSTALLATION OF CONCRETE RODS |
| Rod | |
| 280 ml | |
| M8 | 65/75 |
| M10 | 37/40 |
| M12 | 22/25 |
| M16 | 11/13 |
| M20 | 5/6 |
See application tables for hole depth and diameter values
APPLICATION TABLE FOR RODS IN HOLLOW SUBSTRATES
| Anchor | Installation | Permissible loads | |||||||
| Nozzle |
Rod class 5.8 |
Drill piece diameter d0 | Drill depth | Hole depthhef | Torque Tinst | Hollow bricks fcm: 4,50 MPa | Concrete masonry units fcm: 6,00 MPa | ||
|
|
|
|
|
Traction |
Shears |
Traction |
Shears |
||
| 16/85 | M8 | 17 | 90 | 85 | 4 | 0,40 | 1,10 | - | - |
| 16/85 | M10 | 17 | 90 | 85 | 4 | 0,40 | 1,10 | - | - |
| 16/85 | M12 | 17 | 90 | 85 | 4 | 0,40 | 1,10 | - | - |
| 16/130 | M8 | 17 | 135 | 130 | 4 | - | - | 0,70 | 1,50 |
| 16/130 | M10 | 17 | 135 | 130 | 4 | - | - | 0,70 | 1,50 |
| 16/130 | M12 | 17 | 135 | 130 | 4 | - | - | 0,70 | 1,50 |
APPLICATION TABLE POR CONCRETE RODS
| Anchor | Installation | Resistance | Permissible load | |||||
| Rod class 5.8 | Drill piece diameter d0 | Hole depth h ef | Standard distance edges CCr | Standard distance anchors SCr | Torque Tinst | Characteristic resistance NRk | Concrete C20/25 | Concrete C20/25 |
|
[mm] |
[mm] |
[mm] |
[mm] |
[N.m] |
Traction [kN] |
Traction [kN] |
Shears [kN] |
|
| M8 | 10 | 80 | 80 | 160 | 10 | 14,7 | 4,9 | 5,8 |
| M10 | 12 | 90 | 90 | 180 | 20 | 20,5 | 6,8 | 9,2 |
| M12 | 14 | 110 | 110 | 220 | 40 | 34,6 | 11,5 | 13,4 |
| M16 | 18 | 125 | 125 | 250 | 60 | 47,9 | 16,0 | 24,9 |
| M20 | 24 | 170 | 170 | 340 | 100 | 81,4 | 27,1 | 39,2 |
Safety factor of 3.0 load stress
Recommendations
- Do not apply under 5ºC nor above 30ºC. Higher temperatures will considerably reduce the life of the mixture.
- Using on site and adjustments to the product are only possible before the hardening of PUMAFIX TQP.
- The anchor point must be positioned within the open time.
- During the hardening of the resin the anchor must not be moved or loaded (wait for the necessary time).
- Store between 5ºC and not above 25ºC
- Consult the product label. For more information see the safety datasheet. Please respect regulations, hygiene and waste disposal in the workplace.
Packaging and Storage
80 ml 2-component cartridges.
Shelf life: 18 month in sealed original packaging, sheltered from weather conditions and humidity and stored between 5ºC and not above 25ºC.
Technical data
(Statistical data obtained under standard conditions)
| Density | 1,80 Kg/dm³ |
| Colour | Light Grey (Comp. A: beige; Comp. B: black) |
| Resistance to compression (ASTM D695) | 63 N/mm² |
| Compression module (ASTM D695) | 6300 N/mm² |
| Open time and speed of curing | |
| Application temperature | Open time | Curing time |
| 5º C | 15 min. | 120 min. |
| 10º C | 12 min. | 90 min. |
| 20º C | 6 min. | 45 min. |
| 30º C | 3 min. | 20 min. |
Legal Disclaimer
GRUPO PUMA is not responsible, in any case, for the application of its products or constructive solutions carried out by the application company or other parties involved in the process and / or execution of the work, limiting the responsibility of GRUPO PUMA exclusively to the damages directly attributable to the supplied products, individually or integrated in systems, due to failures in their manufacturing process.
In any case, the drafter of the work project, the technical management or the person responsible for the work, or collaterally the application company or other parties involved in the process and / or execution of the work, must ensure the suitability of the products addressing the characteristics of them, as well as the conditions, support and possible pathologies of the work in question.
The values obtained by GRUPO PUMAS's products or its constructive solutions that, as the case may be, are determined by the EN standards or any other regulation that applies to it in each case refers exclusively to the conditions specifically stipulated in said regulation and that are referred to, among others, to certain characteristics of the support, humidity and temperature conditions, etc. without being them required in the tests obtained under different conditions, all in accordance with the relevant regulation.